Last year, I posted the recipe for Eddie Benghanem’s revisited fraisier, which was amazing. This year, I wanted to publish the classic CAP patisserie version. You’ll see that it’s not a terribly complicated entremet (in fact, it’s one of the simplest, in my opinion). However, to make it really perfect, there are a whole host of tricks and details to follow.
Table des matières
The different elements of a strawberry plant
A strawberry cake consists of a slice of sponge cake soaked in Brix syrup, onto which we place mousseline cream, pieces of strawberries (lots of them!) and which we “close” with another slice of sponge cake. Garnish with icing or marzipan.
For me, the whole point of a strawberry plant is to have a standard size of 4.5 cm. And you’d never know it was so small! It’s not always easy to measure out all the ingredients and avoid overflowing, so keep in mind to “aim small”!
The sponge cake
For the cookie, you’ll find all the tips in my article on sponge cake, or you can download my free ebook “11 CAP techniques to make ALL your pastries a success”. All you have to do is beat the whole eggs and sugar in a food processor for about 15 minutes. The mixture will double in volume. Then gently add the flour and mix with a spatula.
Crème mousseline
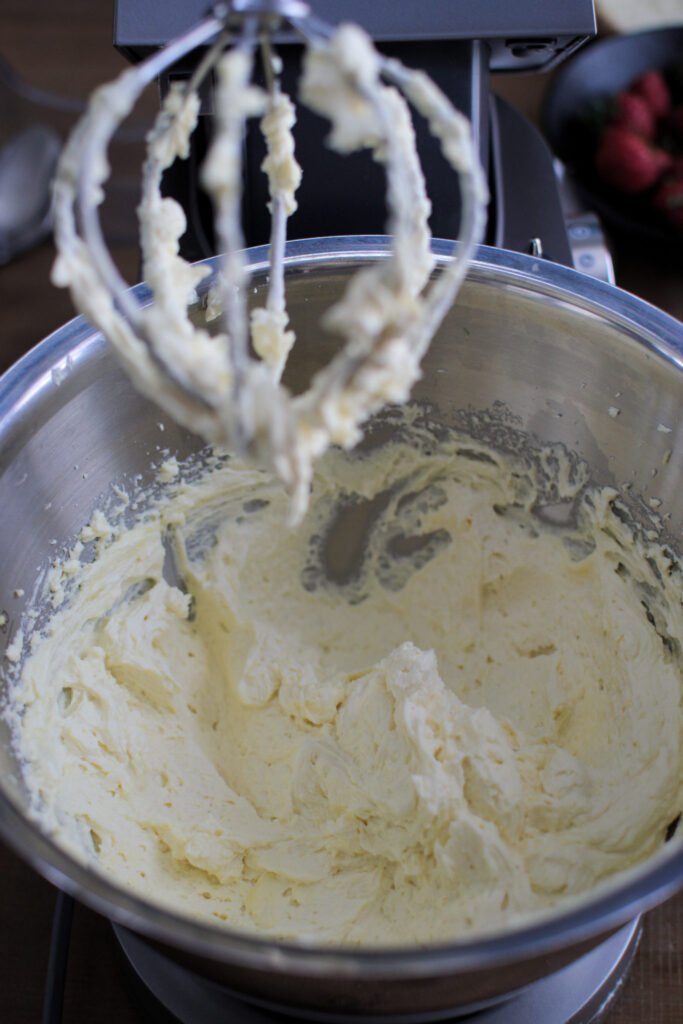
Mousseline is a mixture of crème pâtissière and butter, and I recently described the process in detail in my Paris-Brest recipe. All you have to do is make your own crème pâtissière, leave it to cool and add some butter (the 2 elements must be at roughly the same temperature to prevent the cream from slicing). Then whip at high speed for a good 10 minutes to incorporate the air and swell the cream. And if things don’t go as planned (aka it slices), check out my article 7 tips for catching up on (almost) any recipe!

Brix syrup
There’s just one thing left to do before we get down to assembly: make the brix syrup. Syrup brix 30 or 60 (pronounced syrup brix 30 degrees or 60 degrees). It’s a syrup that can be used for a number of purposes (relaxing fondant, puncturing a cookie, glazing apple turnovers…).
Brix degree measures the weight in grams of dry matter contained in 100 g of product. It is measured using a refractometer. The higher the Brix level, the sweeter the syrup. The formerly widely used Baumé degree (B) has been abandoned in favor of the Brix degree (which has no abbreviation).
Today, 60° or 30° Brix syrup is widely used.
- 60°Brix syrup: 150 g sugar and 115 g water brought to the boil and used at 20°C.
- 30°Brix syrup: 30 g sugar and 70 g water brought to the boil and used at 20°C.
However, for ease of use, the approximation 50 g sugar/50 g water is tolerated for Brix 60° (Brix 50° in reality) and 50 g sugar/100 g water for Brix 30°.
In my opinion, this recipe is one of the first to be included in a recipe book. Tip: you can make more and store it in airtight bottles in the fridge.
Setting up the strawberry plant
Once you’ve got everything you need, it’s time to assemble the fraisier. First step: place the circle on a golden cardboard base and place the entremet circle on top. Don’t forget to put rhodoïd on top to avoid catas when unmolding (and don’t forget to buy 4.5 cm high moulds, otherwise it’s complicated).
We then choose the most beautiful strawberries (and especially the most regular in size) and cut them in half. Make sure you pick your fruit as early as possible, so you don’t end up with a pile of fruit that isn’t very fresh or regular enough for your strawberry patch.
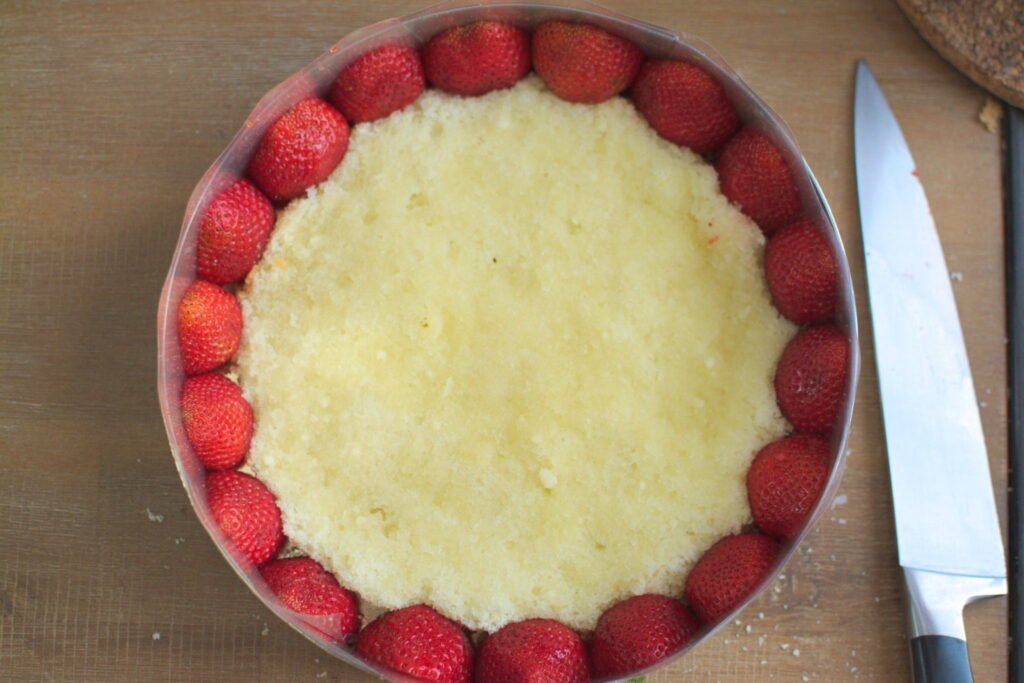
Place the sponge cake circle on top, and arrange the strawberries all around (the inside of the strawberries facing the rhodoïd). Be careful not to squeeze them too tightly, as the pressure may cause them to lift a little on one side. This will look ugly when the circle is removed. Punch the sponge cake with the Brix syrup, and place a light layer of mousseline cream on top.

Next, place the rest of the strawberries, cut into pieces, and cover again with mousseline. Be sure to leave enough space for another slice of sponge cake!
Before placing the mousseline, make sure you put some cream between each strawberry. It’s easy to think that the muslin will settle into place, but in fact it doesn’t. It’s even better to run a small spatula between each strawberry to ensure that the edges are well covered. It’s even better to run a small spatula between each strawberry to make sure the edges are well covered.
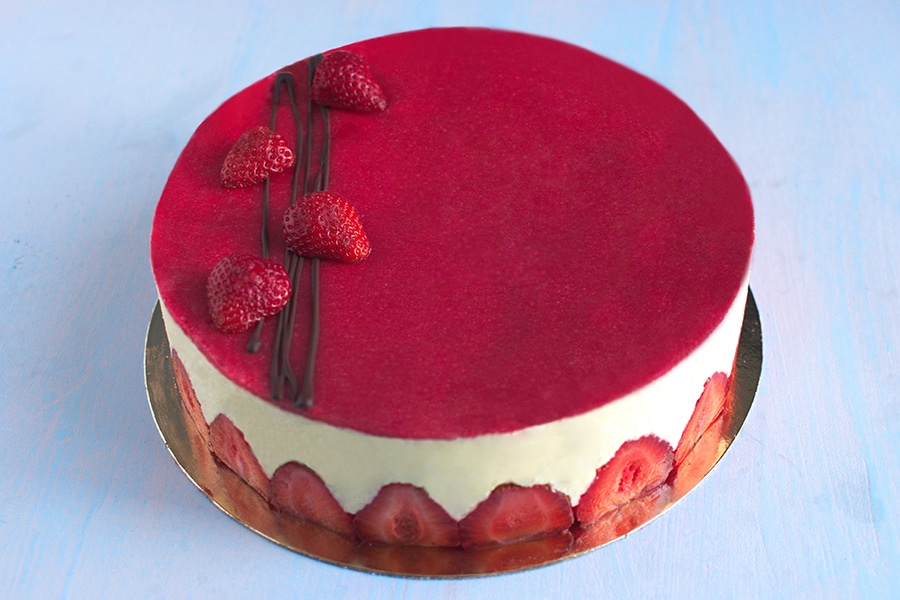
Then place the final layer of sponge cake. Punch down and cover with muslin to smooth the top. Tip: if you’ve used too much muslin, lift the circle a few millimetres to smooth the top. Then place the marzipan or topping on top and decorate in peace! Leave to rest in the fridge for at least 2 hours before unmolding.

Fraisier CAP patisserie
Équipement
- 1 cercle à entremet de 20 cm
Ingredients
Pour un cercle de 20 cm et de 4,5 cm de hauteur
Pour la génoise :
- 150 g d’œufs entiers
- 90 g de sucre
- 90 g de farine
Pour la crème mousseline à la vanille :
- 500 g de lait entier
- 150 g de sucre
- 1 gousse de vanille
- 80 g de jaunes d’œuf (environ 4 jaunes)
- 50 g de poudre à crème ou fécule de maïs
- 220 g de beurre à température ambiante
Pour le sirop :
- 150 g de sucre
- 115 g d’eau
- 1 bouchon d’alcool rhum, kirsch, amaretto, facultatif
Pour la décoration et le montage :
- 300 g à 400 g de fraises
- 300 g de pâte d’amandes
Instructions
Réalisation de la génoise
- Dans la cuve du batteur, battre le sucre et les œufs à vitesse rapide jusqu'à ce que le mélange triple de volume (environ 15 minutes).
- Incorporer délicatement la farine et mélanger doucement à la maryse. Le mélange ne doit pas retomber.
- Transvaser le mélange dans une poche munie d’une douille et pocher sur un gabarit de 18 cm (sur l'envers du papier sulfurisé) ou dans un cerce à entremet.
- Cuire 15-20 min à 180°C. La génoise doit être légèrement dorée, s’être un rétractée et doit être résistante au touché.
Pour la crème mousseline à la vanille
- Pour la crème pâtissière, faire bouillir le lait la vanille fendue et grattée.
- Pendant ce temps, mélanger dans la cuve du robot le sucre avec la poudre à crème puis ajouter les jaunes d’œufs.
- Lorsque le lait boue, le passer à travers un tamis pour retirer les peaux et les gousses de vanille. Puis l’ajouter à la préparation tout en fouettant.
- Transvaser le mélange dans la casserole, et remettre sur le feu. Lorsque la crème commence à bouillir, poursuivre la cuisson encore 1 min. Retirer du feu et laisser refroidir.
- Lorsque la crème pâtissière a bien refroidi, la mettre dans la cuve du robot et fouetter à vitesse moyenne. Ajouter les morceaux de beurre à température ambiante un par un an.
- Quand tout le beurre est incorporé, continuer de fouetter pendant 10 minutes à vitesse rapide pour incorporer de l'air et faire foisonner la préparation.
Sirop brix
- Mélanger le sucre avec l’eau, et porter à ébullition. Ajouter l’alcool et laisser refroidir.
Montage
- Placer le premier disque de génoise dans un cercle de 20 cm de diamètre chemisé avec du film rhodoïd.
- Choisir les fraises les plus régulières et les découper en 2. Les placer entre le cercle et la génoise (intérieur de la fraise face au rhodoïd).
- A l’aide d’un pinceau, puncher la génoise avec le sirop afin de la rendre plus moelleuse.
- Transvaser la crème mousseline dans une poche. Venir déposer une noisette de crème entre chaque tranche de fraise et recouvrir la génoise d’une première fine couche de crème.
- Déposer sur le crème, le reste de fraises découpé en petits morceaux et recouvrir à nouveau d’une fine couche de crème.
- Déposer par-dessus le deuxième disque de génoise, l’imbiber de sirop et le recouvrir du reste de crème. Lisser (vous devez être arrivé presqu’à hauteur du moule).
Pour la décoration :
- Étaler très finement la pâte d’amande entre deux feuilles de papier sulfurisé et venir la déposer sur le dessus du fraisier. A l’aide d’un rouleau à pâtisserie, enlever l’excédent de pâte d’amandes.
- Décorer (ici un peu de chocolat au cornet et quelques fraises)

![No-bake after-eight cake [concours] 15 Gateau after eight camille patisserie](https://camille-patisserie.com/wp-content/uploads/2016/05/Gateau-after-eight-camille-patisserie-150x150.jpg)


